Wednesday, April 4, 2012

Use RSA in C#

RSA is one of the asymmetric encryption algorithm. There are two keys, public and private, in this algorithm. Detail is reference to RSA. In general, the public key is saved as a .crt file and the private key is saved as a .pfx file with password.

To use these two keys, you need to load them by an X509Certificate2 object.

using System.Security.Cryptography.X509Certificates;

RSACryptoServiceProvider LoadPublicKeyFromFile(
string publicKeyFile)
{
///load public key from .crt
X509Certificate2 pubKey =
new X509Certificate2(publicKeyFile);

return (RSACryptoServiceProvider)pubKey.PublicKey.Key;
}

RSACryptoServiceProvider LoadPrivateKeyFromFile(
string privateKeyFile, string password)
{
///load private key from .pfx with password
X509Certificate2 priKey =
new X509Certificate2(privateKeyFile, password);

return (RSACryptoServiceProvider)priKey.PrivateKey;
}

Sometimes, you might need to save the keys into a database. RSACryptoServiceProvider provide simple functions to let you convert it to/from an xml string.

string ToXmlString(RSACryptoServiceProvider key)
{
/// true for private key, false for public key
return key.ToXmlString(true);
}

RSACryptoServiceProvider FromXmlString(string xmlString)
{
RSACryptoServiceProvider key =
new RSACryptoServiceProvider();
key.FromXmlString(xmlString);

return key;
}

Remember, you can get a RSACryptoServiceProvider object whenever you load a public or a private key. Sometimes you might need to use the private key to encrypt a message as a signature and others can use the public key to decrypt and verify if the signature is right from you. And sometimes you might need to use the public key to encrypt a message so that only the private key owner can decrypt it. The usages for both these keys are the same.

byte[] Encrypt(byte[] rawData, RSACryptoServiceProvider key)
{
/// encrypt without OAEP, but PKCS#1 v1.5 padding
return key.Encrypt(rawData, false);
}

byte[] Decrypt(byte[] encData, RSACryptoServiceProvider key)
{
/// decrypt without OAEP, but PKCS#1 v1.5 padding
return key.Decrypt(rawData, false);
}

You can use either padding algorithm, but remember to use the same algorithm in both encryption and decryption. Besides, since the sources for both encryption and decryption are byte arrays. You might need to use Convert.FromBase64String and Encoding.UTF8.GetString to convert strings to/from byte arrays.

--
Reference
RSACryptoServiceProvider Class
Optimal asymmetric encryption padding

Thursday, March 1, 2012

High Availability(HA) of Sql Server Reporting Service(SSRS)

MS SQL Server provide Reporting Service (SSRS) which help customers easily generate database status report like login user list or frequency of some event. As long as there are corresponding records in database, customers can schedule report processing or do it on demand by querying.

But when providing such service, providers need to cover this part when planning high availability (HA) on their system. HA of SSRS can be broken down to three parts: service, RS database (RSDB), and main database.

For the service part, you only need to deploy more servers. For the main database, as all database HA, you can apply cluster or mirroring on it. Since you can set failover partner in the connection string of RS datasource, RS will connect to the backup database server when failover without downtime.

The most difficult part is the HA of RS database. Since you can only set one database in RS server, at least not support until 2008, as reference in ReportServer (TempDB) Mirror capability, the setting won't switch to backup database server when failover.

In such situation, you can separate RS databases which means each RS has its own RSDB. When any one of the RS+RSDB failover, others will still work fine. But since there is no sync in the RSDBs, so you need to import the templates and datasource to each RSDB. At the same time, you will hardly query the report history since they will be recorded in different RSDBs.

The second choose is pure mirroring, set all RS to the same RSDB, as reference to How to: Configure a Report Server Scale-Out Deployment (Reporting Services Configuration). By this way, you need to manually set all RS to the backup RSDB when failover. Still, you can use rsconfig.exe to set RSDB by SQL server agent service, as reference to Reporting Services Disaster Recovery, but you may need to save your credential in the script which might not be accessible in most company policies.

The third way, which is also the suggestion in MS official site, is using cluster in RSDB. But you can't install RS on database cluster, so you need more servers to provide HA. Detail can be reference to Planning a Deployment Topology.

--
Reference
SQL Server Reporting Services Disaster Recovery Case Study
How to: Configure SharePoint Integration on Multiple Servers

Tuesday, January 31, 2012

Expand Disk in Virtaul Machine

One of the greatest advantage to use virtual machine is the flexibility of hardware. Under physical hardware constrain, expanding hardware in a virtual machine is quite simple. For CPU and memory, the setting is automatically complete by Windows. So all we need to do is turn off virtual machine, setting, and turn on it.

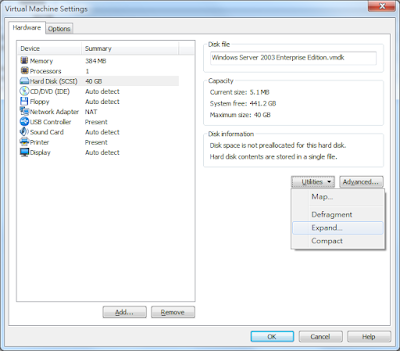
To expand volume size, we need to expand disk in virtual machine settings.

And use embedded program "diskpart" to extend it.

C:\Documents and Settings\Administrator>diskpart

Microsoft DiskPart version 5.2.3790.3959
Copyright (C) 1999-2001 Microsoft Corporation.
On computer: WIN2K3X86

DISKPART> list volume

Volume ### Ltr Label Fs Type Size Status Info
---------- --- ----------- ----- ---------- ------- --------- --------
Volume 0 C NTFS Partition 15 GB Healthy System
Volume 1 D CD-ROM 0 B Healthy
Volume 2 E New Volume NTFS Partition 20 GB Healthy

DISKPART> select volume 2

Volume 2 is the selected volume.

DISKPART> extend

DiskPart successfully extended the volume.

DISKPART> list volume

Volume ### Ltr Label Fs Type Size Status Info
---------- --- ----------- ----- ---------- ------- --------- --------
Volume 0 C NTFS Partition 15 GB Healthy System
Volume 1 D CD-ROM 0 B Healthy
* Volume 2 E New Volume NTFS Partition 21 GB Healthy

DISKPART>


Besides, due to the system disk protection, the function is blocked on system disk in windows 2003. After expand disk in virtual machine settings, we need to mount the disk file in another machine, extend this disk as a normal volume, and turn on the original virtual machine. The system disk is expanded to desired size.

--
Reference
How to Extend Windows Boot Volumes in VMware

Thursday, July 28, 2011

Problem of saving images in WPF (RenderTargetBitmap)

To save a visual to an image file need to use RenderTargetBitmap, detail is reference to Save and read images in WPF.

But sometimes you will find the output image was shifted or left blank. This is because that RenderTargetBitmap render the visual object based on cordinate of its parent object. Margin of itself, Padding or BorderThickness of its parent will all affect the rendered image. Although I think this is a bug of WPF, it seems the feature is by design as reference to RenderTargetBitmap layout offset influence.

There are three ways to fix the problem,
SolutionDescription
Add a BorderSimple, but the visual logical tree is changed.
Use a VisualBrushMaintain the original visaul logical tree, but need to do more process.
Temporary change the reative postion by Measure() and Arrange()Need to change back after rendering, and the two function is automatically called while repainting by WPF, so the real process is hard to tell.

The first solution is simplist. RenderTargetBitmap is only shifted by the distance between visaul and its parent object, so you just need to add a fake parent and move the margin to the parent object.

If the original visual logical tree is like

<Grid>
<Canvas Margin="20" />
</Grid>

changed to

<Grid>
<Border Margin="20">
<Canvas />
</Border>
</Grid>

and just call the method of SaveTo as Save and read images in WPF.

private void SaveTo(Visual v, string f)
{
/// get bound of the visual
Rect b = VisualTreeHelper.GetDescendantBounds(v);

/// new a RenderTargetBitmap with actual size of c
RenderTargetBitmap r = new RenderTargetBitmap(
(int)b.Width, (int)b.Height,
96, 96, PixelFormats.Pbgra32);

/// render visual
r.Render(v);

/// new a JpegBitmapEncoder and add r into it
JpegBitmapEncoder e = new JpegBitmapEncoder();
e.Frames.Add(BitmapFrame.Create(r));

/// new a FileStream to write the image file
FileStream s = new FileStream(f,
FileMode.OpenOrCreate, FileAccess.Write);
e.Save(s);
s.Close();
}

Second solution is draw the visaul to a DrawingVisual object, and pass the object to the SaveTo function.

private DrawingVisual ModifyToDrawingVisual(Visual v)
{
/// new a drawing visual and get its context
DrawingVisual dv = new DrawingVisual();
DrawingContext dc = dv.RenderOpen();

/// generate a visual brush by input, and paint
VisualBrush vb = new VisualBrush(v);
dc.DrawRectangle(vb, null, b);
dc.Close();

return dv;
}

PS. The context will act after calling Close(). You can use the using statement to block the region. And the SaveTo method should be modified as

/// render visual
r.Render(ModifyToDrawingVisual(v));


The third solution is to temporarily change the reative postion by Measure and Arrange before Render,

private void ModifyPosition(FrameworkElement fe)
{
/// get the size of the visual with margin
Size fs = new Size(
fe.ActualWidth +
fe.Margin.Left + fe.Margin.Right,
fe.ActualHeight +
fe.Margin.Top + fe.Margin.Bottom);

/// measure the visual with new size
fe.Measure(fs);

/// arrange the visual to align parent with (0,0)
fe.Arrange(new Rect(
-fe.Margin.Left, -fe.Margin.Top,
fs.Width, fs.Height));
}

PS. The solution is only suitable for UIElement, and need to change the position back after rendering.

private void ModifyPositionBack(FrameworkElement fe)
{
/// remeasure a size smaller than need, wpf will
/// rearrange it to the original position

fe.Measure(new Size());
}

Because the size to be measured is smaller then the real size, WPF will rearrange the layout and align the position back. And the render part is modified as

/// render visual
ModifyPosition(v as FrameworkElement);
r.Render(v);
ModifyPositionBack(v as FrameworkElement);

About Measure() and Arrange(), detail is reference to UIElement.Measure Method

--
Reference
RenderTargetBitmap layout offset influence
RenderTargetBitmap tips
RenderTargetBitmap and XamChart - Broken, Redux

Wednesday, July 27, 2011

Save and read images in WPF

To save WPF objects as an image, you need to render them first, encode the rendered image, and then save to a file through a filestream.

private void SaveTo(Visual v, string f)
{
/// get bound of the visual
Rect b = VisualTreeHelper.GetDescendantBounds(v);

/// new a RenderTargetBitmap with actual size
RenderTargetBitmap r = new RenderTargetBitmap(
(int)b.Width, (int)b.Height,
96, 96, PixelFormats.Pbgra32);

/// render visual
r.Render(v);

/// new a JpegBitmapEncoder and add r into it
JpegBitmapEncoder e = new JpegBitmapEncoder();
e.Frames.Add(BitmapFrame.Create(r));

/// new a FileStream to write the image file
FileStream s = new FileStream(f,
FileMode.OpenOrCreate, FileAccess.Write);
e.Save(s);
s.Close();
}

Remember the output control need to align its parent control, detail is reference to Problem of saving images in WPF (RenderTargetBitmap).

On the other hand, when you want to read an image and show it in WPF, just open the file through a filestream, decode it, and put it into Canvas.

private void LoadFrom(Canvas c, string f)
{
/// new a FileStream to write the image file
FileStream s = new FileStream(f,
FileMode.OpenOrCreate, FileAccess.Read);

/// new a decoder to decode image
BitmapDecoder d = BitmapDecoder.Create(s,
BitmapCreateOptions.None,
BitmapCacheOption.None);

/// new an image with decoded image
Image i = new Image();
i.Source = d.Frames[0];

/// add the image into canvas
c.Children.Add(i);
}

PS. If you close the FileStream during showing, there will cause an exception. So the close action need to be down after the image is no longer to be shown.

Drawing in WPF

The concept of drawing in WPF is quite different with that in .net form. There is no Graphics object to handle the drawing process, you need to new Shape objects (Line, Ellipse, Rectangle, ...) into a Canvas as follow,

1. New a Canvas

In XAML file

<Canvas Margin="0,0,0,0" Name="c"/>

or in C# source file

Canvas c = new Canvas();
this.Content = c;

2. New Shape objects and put them into Canvas

private void DrawLine(Canvas c, Point s, Point e)
{
/// new a line geometry
LineGeometry l = new LineGeometry(s, e);

/// new a path and set its data as the geometry
System.Windows.Shapes.Path p =
new System.Windows.Shapes.Path();
p.Data = l;

/// add the line as a child of canvas
c.Children.Add(p);
}

LineGeometry above can also be replaced with EllipseGeometry or RectangleGeometry to draw an ellipse or a retangle. Besides, WPF will redraw automatically, so just add the objects. And all objects in Canvas is still programalbe.

--
Reference
WPF幾何繪圖
WPF中,如何使用圖像API進行繪製